
前言今天我們一起來看一下如何使用LabVIEW實現語義分割 。
一、什么是語義分割圖像語義分割(semantic segmentation),從字面意思上理解就是讓計算機根據圖像的語義來進行分割,例如讓計算機在輸入下面左圖的情況下,能夠輸出右圖 。語義在語音識別中指的是語音的意思,在圖像領域,語義指的是圖像的內容,對圖片意思的理解,比如下圖的語義就是一個人牽著四只羊;分割的意思是從像素的角度分割出圖片中的不同對象,對原圖中的每個像素都進行標注,比如下圖中淺黃色代表人,藍綠色代表羊 。語義分割任務就是將圖片中的不同類別,用不同的顏色標記出來,每一個類別使用一種顏色 。常用于醫學圖像,衛星圖像,無人車駕駛,機器人等領域 。

文章插圖
- 如何做到將像素點上色呢?

文章插圖
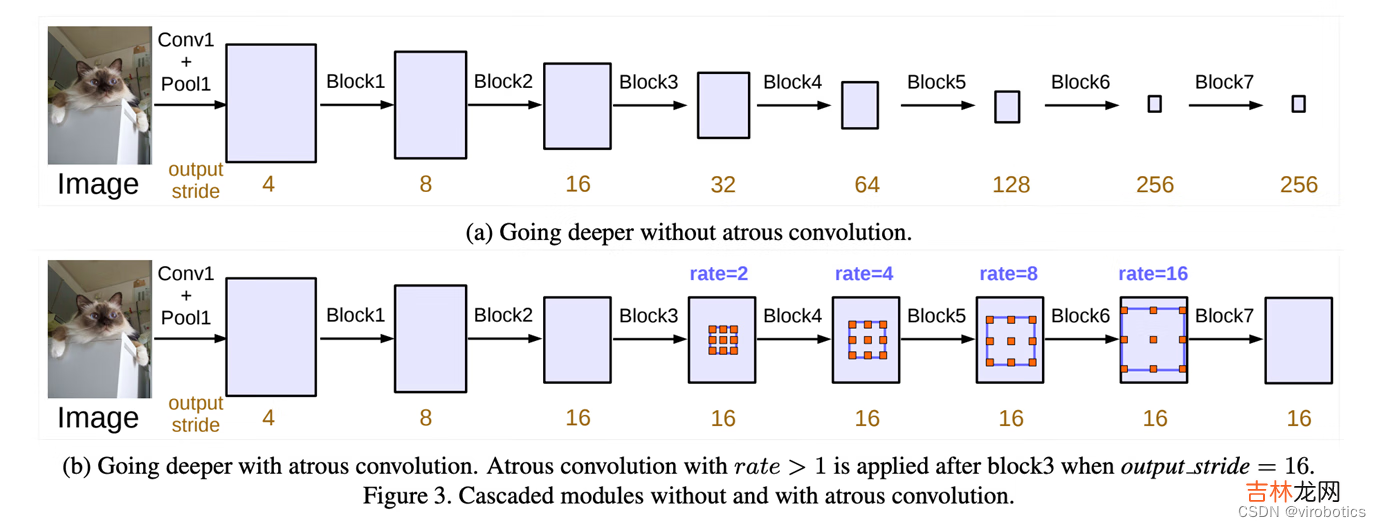
二、什么是deeplabv3DeepLabv3是一種語義分割架構,它在DeepLabv2的基礎上進行了一些修改 。為了處理在多個尺度上分割對象的問題,設計了在級聯或并行中采用多孔卷積的模塊,通過采用多個多孔速率來捕獲多尺度上下文 。此外,來自 DeepLabv2 的 Atrous Spatial Pyramid Pooling模塊增加了編碼全局上下文的圖像級特征,并進一步提高了性能 。
文章插圖
三、LabVIEW調用DeepLabv3實現圖像語義分割1、模型獲取及轉換
- 安裝pytorch和torchvision
- 獲取torchvision中的模型:deeplabv3_resnet101(我們獲取預訓練好的模型):
- 轉onnx

文章插圖

文章插圖
1 def get_pytorch_onnx_model(original_model): 2# define the directory for further converted model save 3onnx_model_path = dirname 4# define the name of further converted model 5onnx_model_name = "deeplabv3_resnet101.onnx" 6 ? 7# create directory for further converted model 8os.makedirs(onnx_model_path, exist_ok=True) 9 ?10# get full path to the converted model11full_model_path = os.path.join(onnx_model_path, onnx_model_name)12 ?13# generate model input14generated_input = Variable(15torch.randn(1, 3, 448, 448)16)17 ?18# model export into ONNX format19torch.onnx.export(20original_model,21generated_input,22full_model_path,23verbose=True,24input_names=["input"],25output_names=["output",'aux'],26opset_version=1127)28 ?29return full_model_path完整獲取及模型轉換python代碼如下:
文章插圖
文章插圖
1 import os 2 import torch 3 import torch.onnx 4 from torch.autograd import Variable 5 from torchvision import models 6 import re 7 ? 8 dirname, filename = os.path.split(os.path.abspath(__file__)) 9 print(dirname)10 ?11 def get_pytorch_onnx_model(original_model):12# define the directory for further converted model save13onnx_model_path = dirname14# define the name of further converted model15onnx_model_name = "deeplabv3_resnet101.onnx"16 ?17# create directory for further converted model18os.makedirs(onnx_model_path, exist_ok=True)19 ?20# get full path to the converted model21full_model_path = os.path.join(onnx_model_path, onnx_model_name)22 ?23# generate model input24generated_input = Variable(25torch.randn(1, 3, 448, 448)26)27 ?28# model export into ONNX format29torch.onnx.export(30original_model,31generated_input,32full_model_path,33verbose=True,34input_names=["input"],35output_names=["output",'aux'],36opset_version=1137)38 ?39return full_model_path40 ?41 ?42 def main():43# initialize PyTorch ResNet-101 model44original_model = models.segmentation.deeplabv3_resnet101(pretrained=True)45 ?46# get the path to the converted into ONNX PyTorch model47full_model_path = get_pytorch_onnx_model(original_model)48print("PyTorch ResNet-101 model was successfully converted: ", full_model_path)49 ?50 ?51 if __name__ == "__main__":52main()
經驗總結擴展閱讀










- 高壓鍋買回來可以直接使用嗎
- 天貓精靈cc7怎么使用_天貓精靈cc7使用方法
- 砂鍋第一次使用怎樣開鍋
- iPadmini6使用體驗_iPadmini6使用感受
- 高光的使用是用在定妝之前還是之后?
- 皙之密1到9號使用步驟是什么?
- FrameLess Qt--無邊框窗口完美實現,包含縮放和移動功能重寫。
- 西瓜水弄衣服上怎么洗干凈
- Nginx 使用自簽名證書實現 https 反代 Spring Boot 中碰到的頁面跳轉問題
- BI系統打包Docker鏡像及部署的技術難度和實現